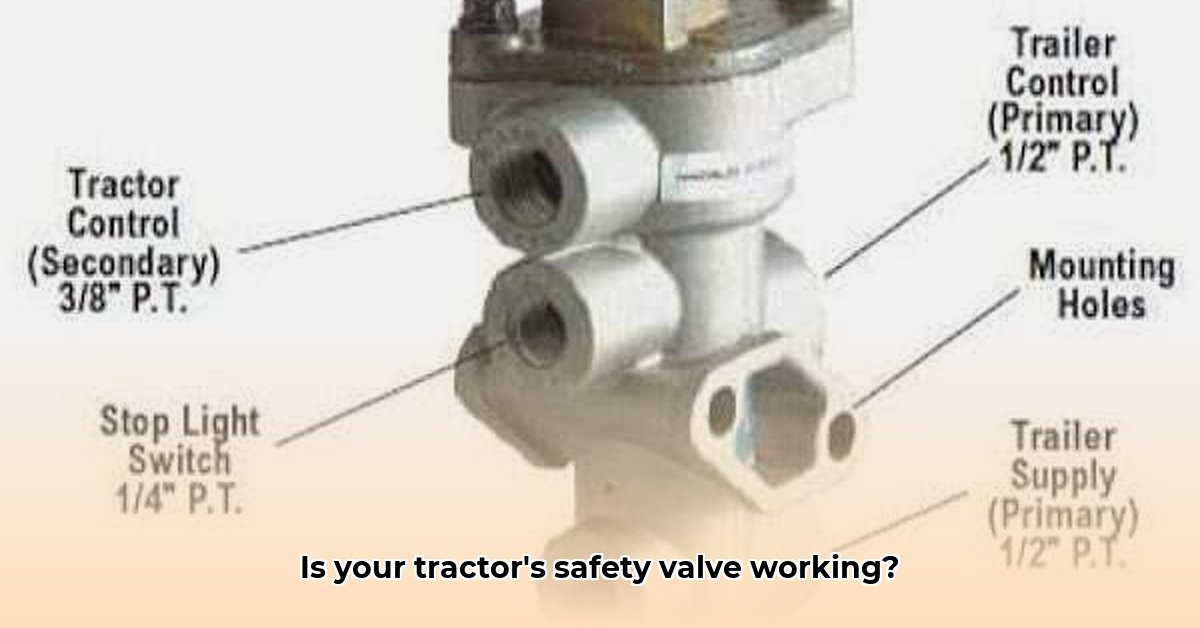
Your tractor's braking system is critical for safety. A key component is the Tractor Protection Valve (TPV), which safeguards against brake failure. Regular testing ensures optimal performance and prevents accidents. This guide provides a step-by-step process for testing your TPV, regardless of your mechanical experience. For more detailed information, see this helpful resource on TPV maintenance.
Tools and Equipment
Before you begin, gather these essential items:
- Wrench (size will vary depending on your tractor model; consult your owner's manual)
- Sturdy work gloves
- Air pressure gauge (optional, but recommended for more precise readings)
- Wheel chocks (for added safety)
Step-by-Step Testing Procedure
These numbered steps ensure a thorough TPV test. Remember to engage your tractor's parking brake and turn off the engine before starting.
Isolate the Trailer: Locate the trailer air supply valve and close it completely. This isolates the trailer's braking system from the tractor's, ensuring a precise TPV test. If no trailer is attached, skip this step.
Disconnect (If Applicable): Carefully disconnect the air lines between the tractor and trailer. Handle the connections gently to avoid damage. Skip this step if you are not towing a trailer.
Build Air Pressure: Firmly depress the service brake pedal to build air pressure within the tractor's braking system.
Listen for Leaks: Concentrate on the trailer's emergency breakaway line connection point. Listen carefully for any hissing sound, indicating a potential air leak.
Release Brakes & Visual Inspection: Release the service brake pedal. Thoroughly inspect the TPV and surrounding connections for any visible damage, loose fittings, cracks, or leaks. A flashlight might help.
Pressure Check (Optional): If you have an air pressure gauge, check the air pressure before and after the braking test. A significant drop may indicate a leak.
Interpreting Test Results
The results clearly indicate the TPV's condition:
No Hissing, No Visible Issues, Minimal Pressure Drop: Your TPV is likely functioning correctly. However, regular testing is still advised.
Hissing, Visible Issues, or Significant Pressure Drop: This points to a potential problem, requiring immediate attention. Do not operate the tractor until the issue is resolved.
Troubleshooting Common Issues
If you detect a problem, consider these troubleshooting steps:
Tighten Connections: Check all air line connections for tightness. Loose connections are a frequent culprit of air leaks.
Inspect the Valve: Carefully examine the TPV for damage, cracks, or wear.
Consult Your Owner's Manual: Refer to your tractor's manual for model-specific troubleshooting information.
Contact a Professional: If you cannot identify or fix the problem, contact a qualified mechanic immediately.
Safety Precautions: Prioritize Safety
Safety is paramount during this procedure:
- Always engage the parking brake.
- Wear gloves to protect your hands.
- Avoid any moving parts.
Next Steps After a Failed Test
A faulty TPV is a serious safety hazard. Do not operate your tractor. Contact a qualified mechanic for repair or replacement. Report any issues to the relevant authorities as required.
Conclusion: Regular Testing for Safety
Regular TPV testing is a crucial part of tractor maintenance. By following these steps, you can ensure the safety and reliability of your tractor's braking system. Consult your owner's manual for the recommended testing frequency. Proactive maintenance is far cheaper and safer than emergency repairs. Remember, your safety, and the safety of others, depends on it.